About D.A.Q.
Home
I started making couplings in 1972 and have been advertising in The Shotgun
News, usually the first issue of the month.
My method is batch production. Once I have a machine set up to make a
part, I make a number of them and put them in inventory. This keeps costs
low.
I served a Tool & Die apprenticeship, worked in gun shop and worked for
gun manufacturers. Precision parts are not beyond my capability. I
make gun parts, pneumatic parts and aircraft parts. This pertains to not
only just turning out parts, but verifying their dimensions and usability.
These are thumbnail pictures, click on them to enlarge.
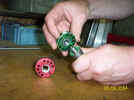
Thread ring gauges are used to verify that the threads meet industry
standard. The green "go" gauge has to go on to the part so that
you know that the thread is not too large. The red "no go" gauge
can't go onto the threaded part more than a turn or so, so you know that the
thread is not too small. The hardened steel center section of the gauge
has been ground to the correct pitch and thread shape, so that unless this is
correct on the part that you're making, the "go" gauge wouldn't fit.
By making threads to industry standards, a part made the other side of
the world or last century or next century will match and mate up. This is
the principle that modern manufacturing is based on, the interchangeability of
parts. I've made parts for aircraft this year that, when sent to the
customer, went perfectly into the assembly that was made in 1941.

Thread micrometer: Ring gauges are expensive, a "go" and "no
go" pair can cost $250., so on a part that is made in lesser quantities you
can verify the thread with a thread micrometer. A thread micrometer,
combined with a self opening die head with its micrometer like adjustments of
the thread depth, allows you to make the near perfect thread (a perfect thread
would be a precision ground one.)

A thread plug gauge is used for checking internal threads. The short
section, pictured at the barrel thread of a breech, is the no-go, it should not
enter the thread. If the no-go entered, it would mean that the thread is
too large and wouldn't have enough holding capacity to keep the barrel snug in
the breech. The longer section, on the left hand side, is the
"go" side and should go into the threaded section its full
length. This lets you know that the thread is correctly machined. By
using modern manufacturing process, I can thread all the parts to the
national standard and I can make the mating thread any time later and I know
they're going to go together properly. No fitting, no reworking, no
sloppiness. One part fits another, just like it should be.


